binder
A lightweight, yet powerful way to bind your application state with your business logic.
The vision
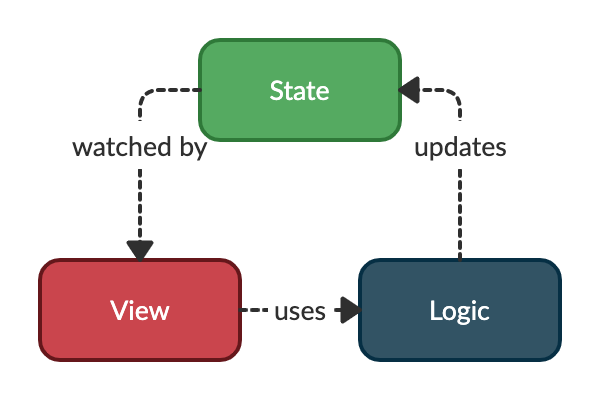
As other state management pattern, binder aims to separate the application state from the business logic that updates it:

We can see the whole application state as the agglomeration of a multitude of tiny states. Each state being independent from each other. A view can be interested in some particular states and has to use a logic component to update them.
- binder
- The vision
- Getting started
- Installation
- Basic usage
- Intermediate usage
- Select
- Consumer
- LogicLoader
- Overrides
- Reusing a reference under a different scope.
- Mocking values in tests
- Advanced usage
- Computed
- Observers
- Undo/Redo
- Disposable
- StateListener
- DartDev Tools
- Snippets
- Contributions
Getting started
Installation
In the pubspec.yaml of your flutter project, add the following dependency:
dependencies:
  binder: <latest_version>
In your library add the following import:
import 'package:binder/binder.dart';
Basic usage
Any state has to be declared through a StateRef with its initial value:
final counterRef = StateRef(0);
Note: A state should be immutable, so that the only way to update it, is through methods provided by this package.
Any logic component has to be declared through a LogicRef with a function that will be used to create it:
final counterViewLogicRef = LogicRef((scope) => CounterViewLogic(scope));
The scope argument can then be used by the logic to mutate the state and access other logic components.
Note: You can declare StateRef and LogicRef objects as public global variables if you want them to be accessible from other parts of your app.
If we want our CounterViewLogic to be able to increment our counter state, we might write something like this:
/// A business logic component can apply the [Logic] mixin to have access to
/// useful methods, such as `write` and `read`.
class CounterViewLogic with Logic {
  const CounterViewLogic(this.scope);

  /// This is the object which is able to interact with other components.
  @override
  final Scope scope;

  /// We can use the [write] method to mutate the state referenced by a
  /// [StateRef] and [read] to obtain its current state.
  void increment() => write(counterRef, read(counterRef) + 1);
}
In order to bind all of this together in a Flutter app, we have to use a dedicated widget called BinderScope. This widget is responsible for holding a part of the application state and for providing the logic components. You will typically create this widget above the MaterialApp widget:
BinderScope(
  child: MaterialApp(
    home: CounterView(),
  ),
);
In any widget under the BinderScope, you can call extension methods on BuildContext to bind the view to the application state and to the business logic components:
class CounterView extends StatelessWidget {
  const CounterView({Key? key}) : super(key: key);

  @override
  Widget build(BuildContext context) {
    /// We call the [watch] extension method on a [StateRef] to rebuild the
    /// widget when the underlaying state changes.
    final counter = context.watch(counterRef);

    return Scaffold(
      appBar: AppBar(title: const Text('Binder example')),
      body: Center(
        child: Column(
          mainAxisAlignment: MainAxisAlignment.center,
          children: <Widget>[
            const Text('You have pushed the button this many times:'),
            Text('$counter', style: Theme.of(context).textTheme.headline4),
          ],
        ),
      ),
      floatingActionButton: FloatingActionButton(
        /// We call the [use] extension method to get a business logic component
        /// and call the appropriate method.
        onPressed: () => context.use(counterViewLogicRef).increment(),
        tooltip: 'Increment',
        child: const Icon(Icons.add),
      ),
    );
  }
}
This is all you need to know for a basic usage.
Note: The whole code for the above snippets is available in the example file.
Intermediate usage
Select
A state can be of a simple type as an int or a String but it can also be more complex, such as the following:
class User {
  const User(this.firstName, this.lastName, this.score);

  final String firstName;
  final String lastName;
  final int score;
}
Some views of an application are only interested in some parts of the global state. In these cases, it can be more efficient to select only the part of the state that is useful for these views.
For example, if we have an app bar title which is only responsible for displaying the full name of a User, and we don’t want it to rebuild every time the score changes, we will use the select method of the StateRef to watch only a sub part of the state:
class AppBarTitle extends StatelessWidget {
  const AppBarTitle({Key? key}) : super(key: key);

  @override
  Widget build(BuildContext context) {
    final fullName = context.watch(
      userRef.select((user) => '${user.firstName} ${user.lastName}'),
    );
    return Text(fullName);
  }
}
Consumer
If you want to rebuild only a part of your widget tree and don’t want to create a new widget, you can use the Consumer widget. This widget can take a watchable (a StateRef or even a selected state of a StateRef).
class MyAppBar extends StatelessWidget {
  const MyAppBar({Key? key}) : super(key: key);

  @override
  Widget build(BuildContext context) {
    return AppBar(
      title: Consumer(
        watchable:
            userRef.select((user) => '${user.firstName} ${user.lastName}'),
        builder: (context, String fullName, child) => Text(fullName),
      ),
    );
  }
}
LogicLoader
If you want to trigger an asynchronous data load of a logic, from the widget side, LogicLoader is the widget you need!
To use it, you have to implement the Loadable interface in the logic which needs to load data. Then you’ll have to override the load method and fetch the data inside it.
final usersRef = StateRef(const <User>[]);
final loadingRef = StateRef(false);

final usersLogicRef = LogicRef((scope) => UsersLogic(scope));

class UsersLogic with Logic implements Loadable {
  const UsersLogic(this.scope);

  @override
  final Scope scope;

  UsersRepository get _usersRepository => use(usersRepositoryRef);

  @override
  Future<void> load() async {
    write(loadingRef, true);
    final users = await _usersRepository.fetchAll();
    write(usersRef, users);
    write(loadingRef, false);
  }
}
From the widget side, you’ll have to use the LogicLoader and provide it the logic references you want to load:
class Home extends StatelessWidget {
  const Home({
    Key? key,
  }) : super(key: key);

  @override
  Widget build(BuildContext context) {
    return LogicLoader(
      refs: [usersLogicRef],
      child: const UsersView(),
    );
  }
}
You can watch the state in a subtree to display a progress indicator when the data is fetching:
class UsersView extends StatelessWidget {
  const UsersView({
    Key? key,
  }) : super(key: key);

  @override
  Widget build(BuildContext context) {
    final loading = context.watch(loadingRef);
    if (loading) {
      return const CircularProgressIndicator();
    }

    // Display the users in a list when have been fetched.
    final users = context.watch(usersRef);
    return ListView(...);
  }
}
Alternatively, you can use the builder parameter to achieve the same goal:
class Home extends StatelessWidget {
  const Home({
    Key? key,
  }) : super(key: key);

  @override
  Widget build(BuildContext context) {
    return LogicLoader(
      refs: [usersLogicRef],
      builder: (context, loading, child) {
        if (loading) {
          return const CircularProgressIndicator();
        }

        // Display the users in a list when have been fetched.
        final users = context.watch(usersRef);
        return ListView();
      },
    );
  }
}
Overrides
It can be useful to be able to override the initial state of StateRef or the factory of LogicRef in some conditions:
- When we want a subtree to have its own state/logic under the same reference.
- For mocking values in tests.
Reusing a reference under a different scope.
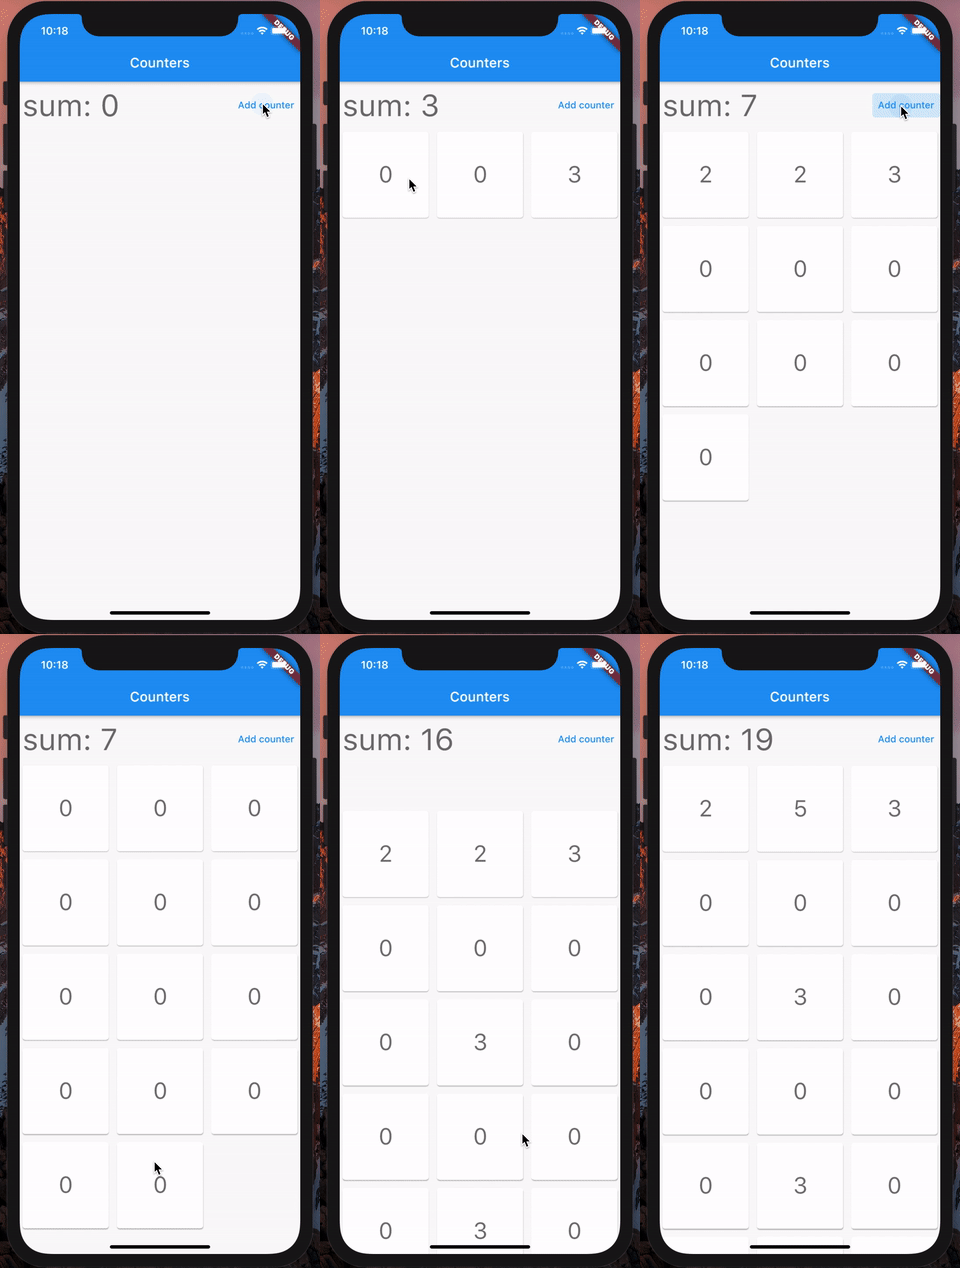
Let’s say we want to create an app where a user can create counters and see the sum of all counters:

We could do this by having a global state being a list of integers, and a business logic component for adding counters and increment them:
final countersRef = StateRef(const <int>[]);

final countersLogic = LogicRef((scope) => CountersLogic(scope));

class CountersLogic with Logic {
  const CountersLogic(this.scope);

  @override
  final Scope scope;

  void addCounter() {
    write(countersRef, read(countersRef).toList()..add(0));
  }

  void increment(int index) {
    final counters = read(countersRef).toList();
    counters[index]++;
    write(countersRef, counters);
  }
}
We can then use the select extension method in a widget to watch the sum of this list:
final sum = context.watch(countersRef.select(
  (counters) => counters.fold<int>(0, (a, b) => a + b),
));
Now, for creating the counter view, we can have an index parameter in the constructor of this view. This has some drawbacks:
- If a child widget needs to access this index, we would need to pass the
indexfor every widget down the tree, up to our child. - We cannot use the
constkeyword anymore.
A better approach would be to create a BinderScope above each counter widget. We would then configure this BinderScope to override the state of a StateRef for its descendants, with a different initial value.
Any StateRef or LogicRef can be overriden in a BinderScope. When looking for the current state, a descendant will get the state of the first reference overriden in a BinderScope until the root BinderScope. This can be written like this:
final indexRef = StateRef(0);

class HomeView extends StatelessWidget {
  @override
  Widget build(BuildContext context) {
    final countersCount =
        context.watch(countersRef.select((counters) => counters.length));

    return Scaffold(
     ...
      child: GridView(
        ...
        children: [
          for (int i = 0; i < countersCount; i++)
            BinderScope(
              overrides: [indexRef.overrideWith(i)],
              child: const CounterView(),
            ),
        ],
      ),
     ...
    );
  }
}
The BinderScope constructor has an overrides parameter which can be supplied from an overrideWith method on StateRef and LogicRef instances.
Note: The whole code for the above snippets is available in the example file.
Mocking values in tests
Let’s say you have an api client in your app:
final apiClientRef = LogicRef((scope) => ApiClient());
If you want to provide a mock instead, while testing, you can do:
testWidgets('Test your view by mocking the api client', (tester) async {
  final mockApiClient = MockApiClient();

  // Build our app and trigger a frame.
  await tester.pumpWidget(
    BinderScope(
      overrides: [apiClientRef.overrideWith((scope) => mockApiClient)],
      child: const MyApp(),
    ),
  );

  expect(...);
});
Whenever the apiClientRef is used in your app, the MockApiClient instance will be used instead of the real one.
Advanced usage
Computed
You may encounter a situation where different widgets are interested in a derived state which is computed from different sates. In this situation it can be helpful to have a way to define this derived state globally, so that you don’t have to copy/paste this logic across your widgets. Binder comes with a Computed class to help you with that use case.
Let’s say you have a list of products referenced by productsRef, each product has a price, and you can filter these products according to a price range (referenced by minPriceRef and maxPriceRef).
You could then define the following Computed instance:
final filteredProductsRef = Computed((watch) {
  final products = watch(productsRef);
  final minPrice = watch(minPriceRef);
  final maxPrice = watch(maxPriceRef);

  return products
      .where((p) => p.price >= minPrice && p.price <= maxPrice)
      .toList();
});
Like StateRef you can watch a Computed in the build method of a widget:
@override
Widget build(BuildContext context) {
  final filteredProducts = context.watch(filteredProductsRef);
  ...
  // Do something with `filteredProducts`.
}
Note: The whole code for the above snippets is available in the example file.
Observers
You may want to observe when the state changed and do some action accordingly (for example, logging state changes). To do so, you’ll need to implement the StateObserver interface (or use a DelegatingStateObserver) and provide an instance to the observers parameter of the BinderScope constructor.
bool onStateUpdated<T>(StateRef<T> ref, T oldState, T newState, Object action) {
  logs.add(
    '[${ref.key.name}#$action] changed from $oldState to $newState',
  );

  // Indicates whether this observer handled the changes.
  // If true, then other observers are not called.
  return true;
}
...
BinderScope(
  observers: [DelegatingStateObserver(onStateUpdated)],
  child: const SubTree(),
);
Undo/Redo
Binder comes with a built-in way to move in the timeline of the state changes. To be able to undo/redo a state change, you must add a MementoScope in your tree. The MementoScope will be able to observe all changes made below it:
return MementoScope(
  child: Builder(builder: (context) {
    return MaterialApp(
      home: const MyHomePage(),
    );
  }),
);
Then, in a business logic, stored below the MementoScope, you will be able to call undo/redo methods.
Note: You will get an AssertionError at runtime if you don’t provide a MementoScope above the business logic calling undo/redo.
Disposable
In some situation, you’ll want to do some action before the BinderScope hosting a business logic component, is disposed. To have the chance to do this, your logic will need to implement the Disposable interface.
class MyLogic with Logic implements Disposable {
  void dispose(){
    // Do some stuff before this logic go away.
  }
}
StateListener
If you want to navigate to another screen or show a dialog when a state change, you can use the StateListener widget.
For example, in an authentication view, you may want to show an alert dialog when the authentication failed. To do it, in the logic component you could set a state indicating whether the authentication succeeded or not, and have a StateListener in your view do respond to these state changes:
return StateListener(
  watchable: authenticationResultRef,
  onStateChanged: (context, AuthenticationResult state) {
    if (state is AuthenticationFailure) {
      showDialog<void>(
        context: context,
        builder: (context) {
          return AlertDialog(
            title: const Text('Error'),
            content: const Text('Authentication failed'),
            actions: [
              TextButton(
                onPressed: () => Navigator.of(context).pop(),
                child: const Text('Ok'),
              ),
            ],
          );
        },
      );
    } else {
      Navigator.of(context).pushReplacementNamed(route_names.home);
    }
  },
  child: child,
);
In the above snippet, each time the state referenced by authenticationResultRef changes, the onStateChanged callback is fired. In this callback we simply verify the type of the state to determine whether we have to show an alert dialog or not.
DartDev Tools
Binder wants to simplify the debugging of your app. By using the DartDev tools, you will be able to inspect the current states hosted by any BinderScope.
Snippets
You can find code snippets for vscode at snippets.
Contributions
Feel free to contribute to this project.
If you find a bug or want a feature, but don’t know how to fix/implement it, please fill an issue.
If you fixed a bug or implemented a feature, please send a pull request.
Download state binder app source code on GitHub
https://github.com/letsar/binder
Provides the list of the opensource Flutter apps collection with GitHub repository.


